Preamble:
All my patterns are available from my NoRulesQuilting Etsy
store and Quilt Pattern Mart.
Etsy allows me to list in Canadian Dollars and being
Canadian, that’s what I do. Quilt Pattern Mart only allows for US Dollars. So, if you are looking at both sites, you
will see the numbers are different, but the value is roughly the same (rounded
for simplicity). It’s a sad fact that
the USD is worth quite a bit more than the CD at this time.
All my patterns have been tested by experienced quilters. Thanks so much to all my testers – they are my
reality check and always offer suggestions for improvement. My patterns are much better for their input. Every effort is made to ensure error free
patterns, but if you do find one, please let me know so I can fix it.
All my patterns provide illustrated step-by-step instructions,
a colouring sheet, construction tips, any necessary pattern pieces and all the
usual things expected in a pattern. And
I do one of these “support pages” for each pattern because a pattern is not a book!
With that – let’s get on to it!
Art Deco!
A quilt inspired by Art Deco design and architecture. This quilt is reminiscent of an Art Deco theatre sign. Imagine the small square-in-square blocks as the flashing lights.
*******
This pattern is great for showing off large print fabric that you don't want to cut into small pieces, or to fussy cut a fabric motif, as I did. There is a 15" Square-in-Square (SIS) block smack in the centre of the quilt that is a perfect showcase for these kinds of fabrics. For the pattern cover quilt, I fussy cut
Lucy and Ollie fabric for the centre 15" SIS block, the 11" SIS block and the Flying Geese on the left and right sides. Be aware if you are fussy cutting, you will likely need more fabric than what the pattern suggests for Fabric 3. Also more for Fabric 6 if you want to do some fussy cutting for the remaining Flying Geese.
********
Errata
Any author hates to find errors, but I have so need to let you know. In the initial printing, on Page 6 of 7, the illustrations in Fig 15, 16 and 20 show F1 for opposite corners of the 3" square-in-square blocks. This should actually be F4. On Page 1 of 7, last bullet point under General Instructions, 8" x 25 1/4" should be 8" x 18 1/2". Similarly, the 8" x 25 1/4" identification on Page 7 of 7 should be 8" x 18 1/2". These errors have been corrected for subsequent printings and are not in the on-line version. My apologies for these errors.
********
About Fussy Cutting:
For the pattern’s cover quilt, I fussy cut some fabric to feature the cat faces in the centre of the 15" and 11" Square-in-Square (SIS) and in the centre triangles of two Flying Geese (FG) blocks. If you decide you would like to fussy cut for these blocks, more Fabric 3 (and possibly Fabric 6 if you decide to fussy cut the inside FG blocks as well) will be required if cutting on point.
If fussy cutting on point, I recommend making a paper pattern for the pieces to be fussy cut. These can first be used to determine the amount of fabric to purchase by placing them in the desired position on the fabric before it is cut and then used to cut the pieces.
*******
The pattern includes a colouring sheet - print a few to experiment with different colourways and/or doodle some quilting designs. The pattern includes a diagram of the quilting design I used and there is a tutorial for how I did it below. The pattern also has cutting diagrams.
*******
Art Deco is being distributed by
Erie Quilt Art. If you would like it but can't find it, ask your local quilt store to bring it in.
*******
Fabric Placement Key
Art Deco Quilting Tutorial
Refer to the Quilt Design Diagram provided with the pattern
I took these pix while quilting my second Art Deco quilt. My feature fabric is some of
Tula Pink's Elizabeth line. If you decide to quilt yours using the Quilting Design Diagram provided in the pattern, the pix and descriptions below may be of assistance. Please note that I quilt on a long arm so that is my reference. And one last reminder before we get started - remember if you click on the photos, they enlarge so you can see the stitching a bit better.
After loading the quilt, I stitched-in-the-ditch (SID, ditched, ditch) around all the block pieces. The rule was SID anything with at least one coloured (i.e., not two background) block piece. The exception was the small square-in-square blocks - for those I ditched around the whole assembled "U" shape formed by the blocks and around the centre squares - I did not ditch between each block. I used an 80 weight poly thread (top and bottom) for ditching.
As part of this step, I also stitched around Elizabeth's face in each of the fussy cut blocks to give her more definition - and to quilt the three layers together, of course.
Ditch your way to the bottom of the quilt. I pin basted the edges as I went. Once at the bottom (which is actually one side of the quilt in my case as I oriented the quilt horizontally on my frame), release the bottom from the roll bar (unless you are floating) and baste the bottom. Trim off excess batting from the "bottom". Now you can roll up and down freely to start the actual quilting.
*******
Large Square Motif
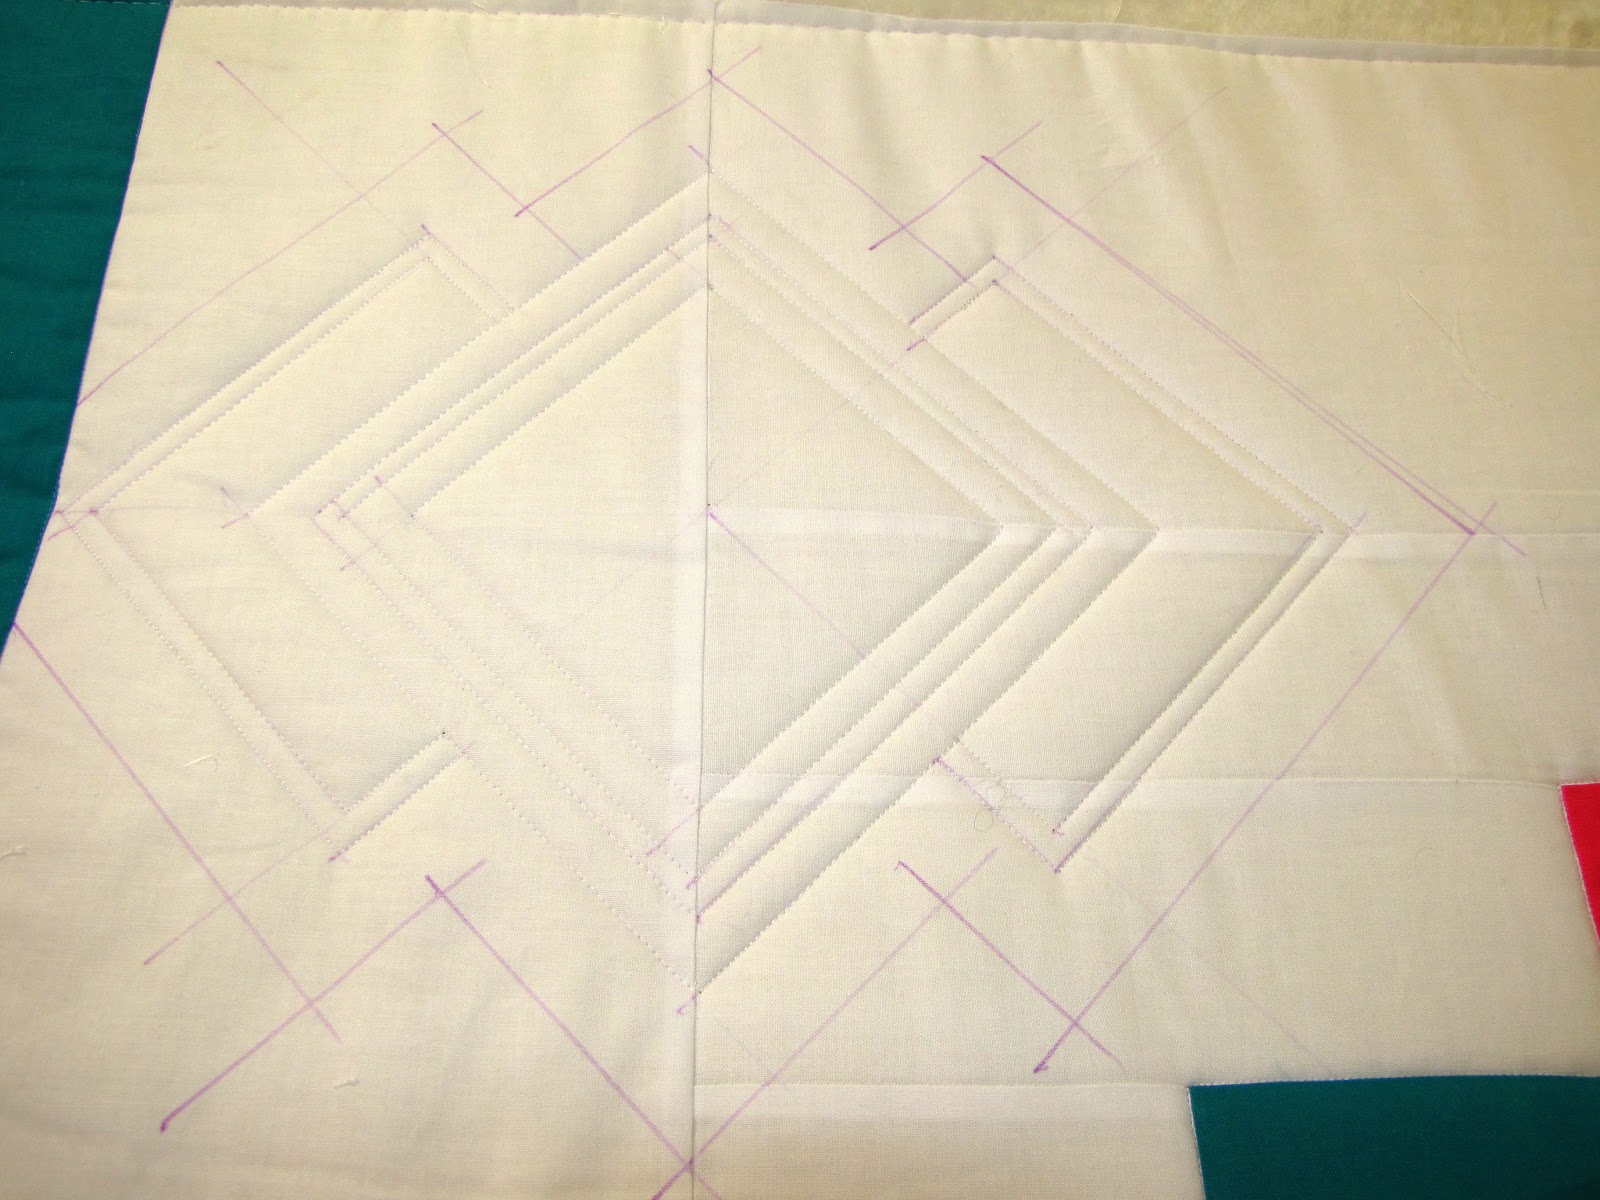
Find the outside corner of a graduated block where it intersects with the adjacent background pieces. This is the centre of the large motif in the background section of each quarter of the quilt. Using the three seams and a fourth line marked to complete the centre registration lines, centre your 6" square ruler as shown above. (That's my favourite marking tool - a purple air erase pen.)
Switch out to your quilting thread, if different. I used 40 weight poly for all the quilting except the ditching and stitching around Elizabeth (top and bottom, although you can continue with 80 weight on the bottom if that is your preference. I should note here that you certainly don't have to follow my thread choices!).
I should also mention that whenever the lines being stitched are straight, I use a straight ruler - I haven't shown that in the pix too often. This is ruler intensive quilting. Similarly, with curves, I've used circle or arc rulers.
Mark a 6" square.
Mark three more squares:
- 1/4" inside the 6" square;
- 3/4" inside the 6" square;
- 1/2" outside the 6" square.
Stitch all four squares using your straight edge ruler.
Mark a line through the half-way point of each side of the squares. The lines should intersect the centre point. (Note - the ruler shown above is a cutting/marking ruler, NOT a long-arm ruler - do NOT use your cutting/marking rulers as long-arm quilting rulers!!!)
Mark the extensions:
Using the centre lines you just marked as the short edges, mark the long edges at 1 1/4" from the outside square. Then mark the second edge at 1/4" outside the first edge.
Stitch the extensions.
Mark a 1" "frame" around the entire motif outline.
Stitch the frame. Note that the frame intersects the Accent Block and is not stitched into those blocks. Start/stop stitching at the Accent Block seam.
Mark the half way point of each quarter section of the inside square.
Mark radial lines by joining opposite half-way points. These lines should intersect the centre point if everything has been lined up properly.
Remember that the seams are also "radial lines" for our purposes.
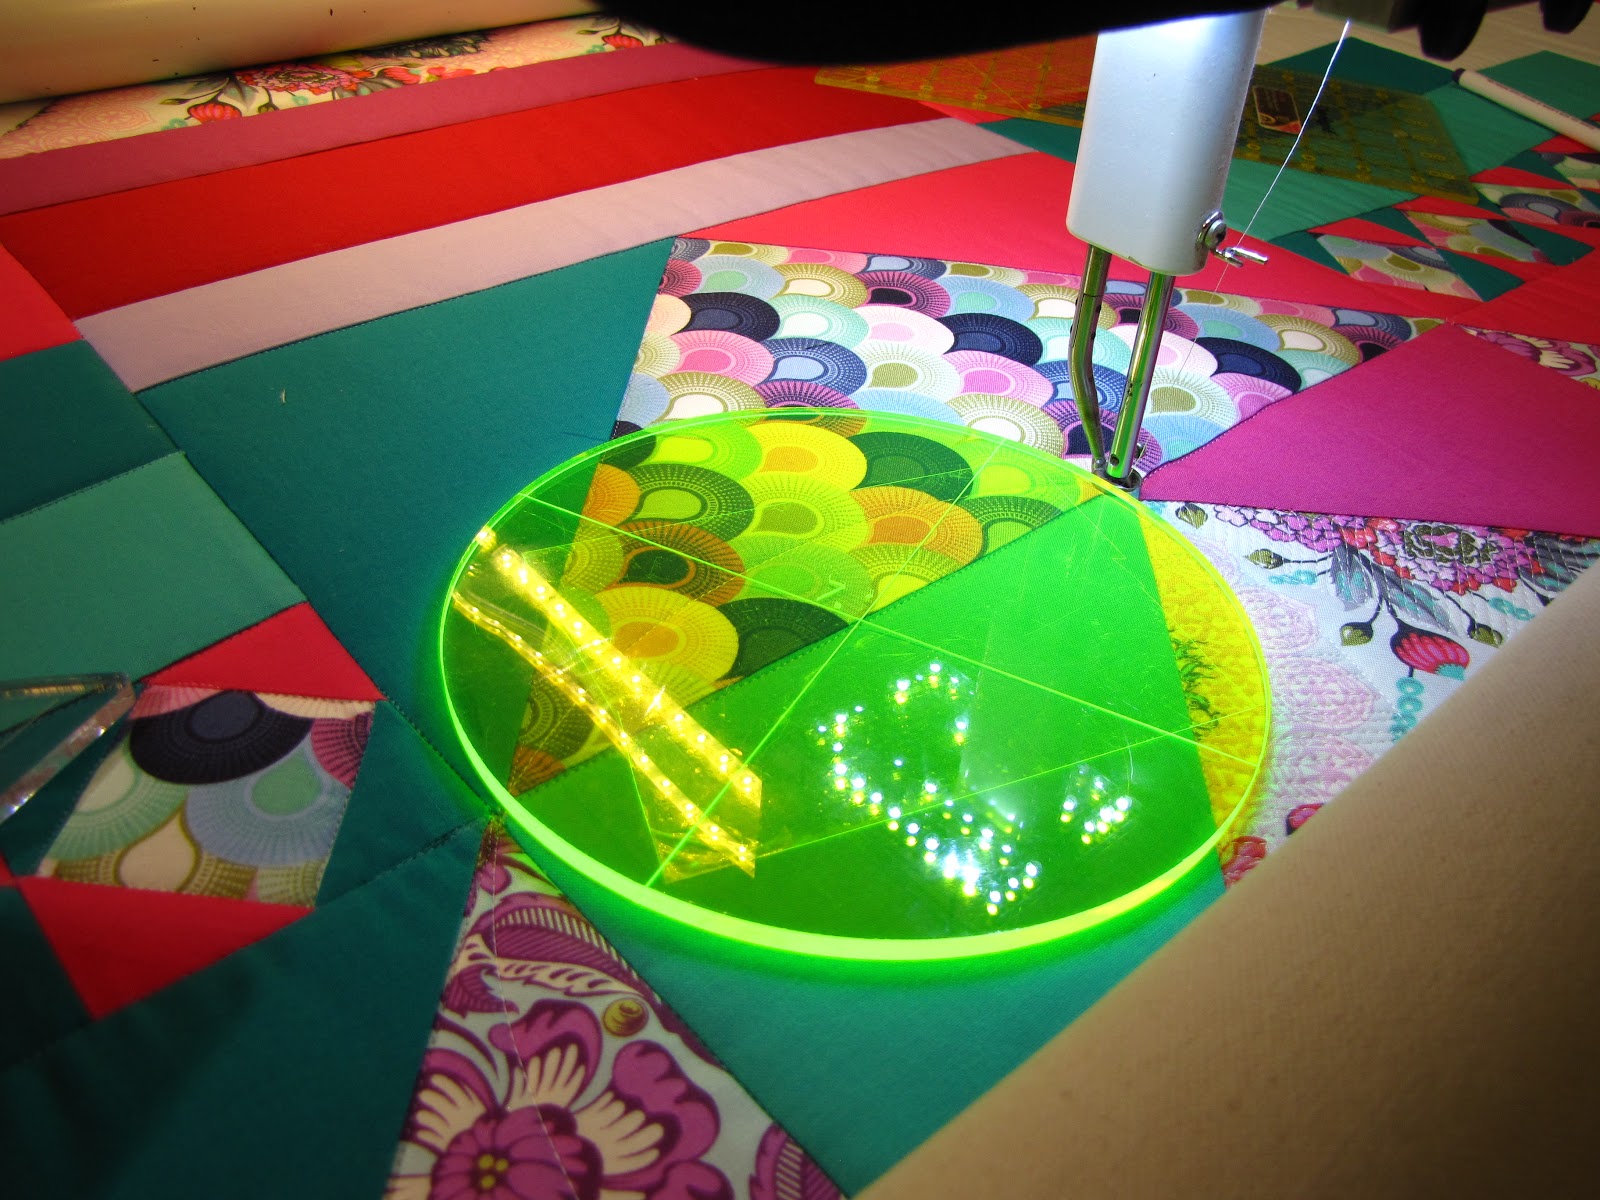
I used my pebble ruler to stitch a 1" circle at the centre. If you don't have a small circle template, simply stitch a small square in the centre using the same orientation as the ones you have previously quilted. Stop stitching on a radial line, needle down. Do not tie off.
Stitch all the radial lines. This can be done without tying off - stitch from the centre circle to the inside square, travel along the square to the next radial, stitch down to the circle, travel along the circle to the next radial and so on until finished.
The final step for this motif is to stitch in the feathery things in the extensions. I started at the end corners and worked my way out to the centres, one side at a time. Done!
There are four of these motifs, one in each quadrant of the quilt.
*******
Framing the Centre Medallion
(And by "Centre Medallion" I mean all the coloured blocks in the centre of the quilt, not the Accent Blocks.)
Begin at the intersection of a flying goose and striped block. Mark a line at a 45 degree angle to the striped block, as shown above (perpendicular to the Elizabeth triangle of the Flying Goose). Mark lines that are parallel to that first 45 degree line at 1" intervals along that triangle until there is no room for more. Come back down to the first line and begin marking a 1" "framing" line around the centre medallion. Mark as far as you can without rolling the quilt.


Once you've marked all you can without advancing the quilt, begin stitching from the top of the diagonal lines. Work out whether to start at the edge of the quilt or on the Elizabeth triangle edge. You want to end up in the Elizabeth triangle/striped block intersection point. Stitch and travel to the next line until you end up at that point (don't worry if you end up on the edge of the quilt, either backtrack along the last line or tie off and start again). Assuming you've worked it out so you don't have to tie off, backtrack that first inch or so to the line marking the 1" frame and begin stitching along the frame. Stop, needle down, at the corner, change direction and continue stitching.

Once you get as far as you can, advance the quilt, mark, and keep going until you hit the edge. Be aware that there is one point where the frame of the Large Square Motif may intersect the frame of the Centre Medallion. I gave the motif preference and stitched around it. Follow this process for each of the four quadrants of the quilt.
*******
Background Filler
Next up - background filler. It's next because it's done in the same colour as the Large Square Motif and framing (although if you want to use a different colour, go for it - it's your quilt, you get to do what you want! 😎). For this one, I did a swirly thing, and for the pattern cover quilt I did a modified meander - it looks like a topo-map. Chose your favourite filler but remember the goal here is to pop the motif, not an elaborate filler. Reasonably dense, but something that will not be the main attraction.
Fill around the Large Square Motif and into all the negative space in the background area of each quadrant, but not into the framing. Note in the pix above that one corner of the Centre Medallion frame cuts into the Large Square Motif - I let the Large Square Motif override the Centre Medallion frame.
*******
The Elizabeths
First, as noted above, I used curved rulers for quilting the Elizabeth sections. I had to play around a bit to settle on the size I wanted and you will have to do the same. I didn't want to stitch over the faces, so the curves had to be relatively flat. Your fabric choice will dictate what you do here. A further note, if you did not fussy cut and stitch around the feature design, you may need to add some quilting into the centre to avoid a weird puffy spot. Either make bigger curves or do a design such as the Maori fish hook design into the centre.
With that, here we go....
Oh - and one further note... The 15" and 11" SIS centres are done in the same way - just slightly different sizes so may need to use different curve rulers.
Start in one corner of the SIS centre square. Using your circle or arc ruler, stitch the arcs from corner to corner to corner all the way around the square. When you get to your starting point, stop, needle down, do not tie off.
I used match stick quilting to fill in the arcs. Don't feel you have to stick to this, there are other things you can try (pebbles, wish bone, ribbon candy, feathers, etc.). Try it without your regulator. Faster, smoother. At least it is on my machine. Moving in a continuous direction, fill in one, the next, next, last arc.
Once you've gone around the four sides, she's done! Do this for each of the three large SIS blocks.
Now for the two flying geese HSTs. I deviated from my diagram, which was drawn before I made this quilt. Instead, I did two curves on each of the short sides of the HST, as shown below.
Find the halfway point of the long side of the HST. I do this by making sure my ruler is square with the long side of the HST and intersecting with the point on the opposite side. You could also measure it if you prefer.
Now line your ruler up so that the ruler is square with the short side of the HST and intersecting that marked centre of the long side. Mark this centre on the short side.
Place the circle ruler such that it will make an arc from the corner to the midpoint, as above, then stitch.
Shirt the circle to the next arc and stitch. Stitch two more arcs on the next side. Stop, do not tie off. Working back the way you came, fill under the arcs. Stop and tie off.
Repeat for the other side. Done.
Small Square in Square Blocks
There are 34 small SIS blocks - 17 on each half of the quilt. Each set of 17 is set in a sort of "U" shape. As noted above, I ditched the U, and the inside squares. I continued with white thread here because there are several colours involved so what do you use? I'm lazy so stayed with white - the print is on a white background. But obviously, use the best colour for your fabric and the effect you want.

For the rest I did a modified orange peel design. As shown above, I started on the inside square and worked up (or across) a set of squares (as many as possible without needing to roll the quilt). Start in one corner between two SIS blocks (not on the ditched seam), stitch one inside side, move to the next. This brings you to the corner opposite the starting corner. Do not continue around the square. Instead, without tying off, move into the next square and do two adjacent inside sides, continue to the next square. Repeat until coming to the farthest corner of the last square. Now reverse direction and stitch down the opposite inside sides, completing the stitching for the inside of the squares. Stop at the starting corner.
Repeat the process, but for the outside sides of the squares.
Once the section is complete, roll the quilt and continue in a similar manner until all the small SIS blocks have been quilted.
Centre Flying Geese
There are four remaining Flying Geese blocks - we already quilted the ones showing off Elizabeth on each side, these are the ones around the centre Elizabeth SIS block. Still with white thread.
As usual, first mark the centres of the short sides, as described in the Elizabeth section above.
Arcs are quilted to radiate from the centre of the long sides of the centre triangle. However, the entire set of four blocks can be quilted without tying off if you start, needle down, on an outside corner as shown above. Set your arc/circle ruler and stitch an arc from the outside corner to the centre mark of the long side (above - below).
Switch out to a smaller ruler for the next set of arcs, which are stitched from the long side centre to the short side centre and back (above, below).
Switch back to the larger ruler for the next set of arcs that are stitched from the long side centre to the opposite point (above - below).
Once this centre set of arcs is complete, you can stitch in a Maori fish hook - I neglected to take a pix of this. Do it at this point or you will have to come back to do it later if it's something you want in your quilt. This is the best point to do it as you won't have to tie off.
Keep going with the next set of arcs - as before, smaller ruler, to center point of short side and back. Then back to the larger ruler and stitch that last arc to the far corner. Stop, needle down, repeat for the next three blocks until you end up back at your starting point at the first block. Done.
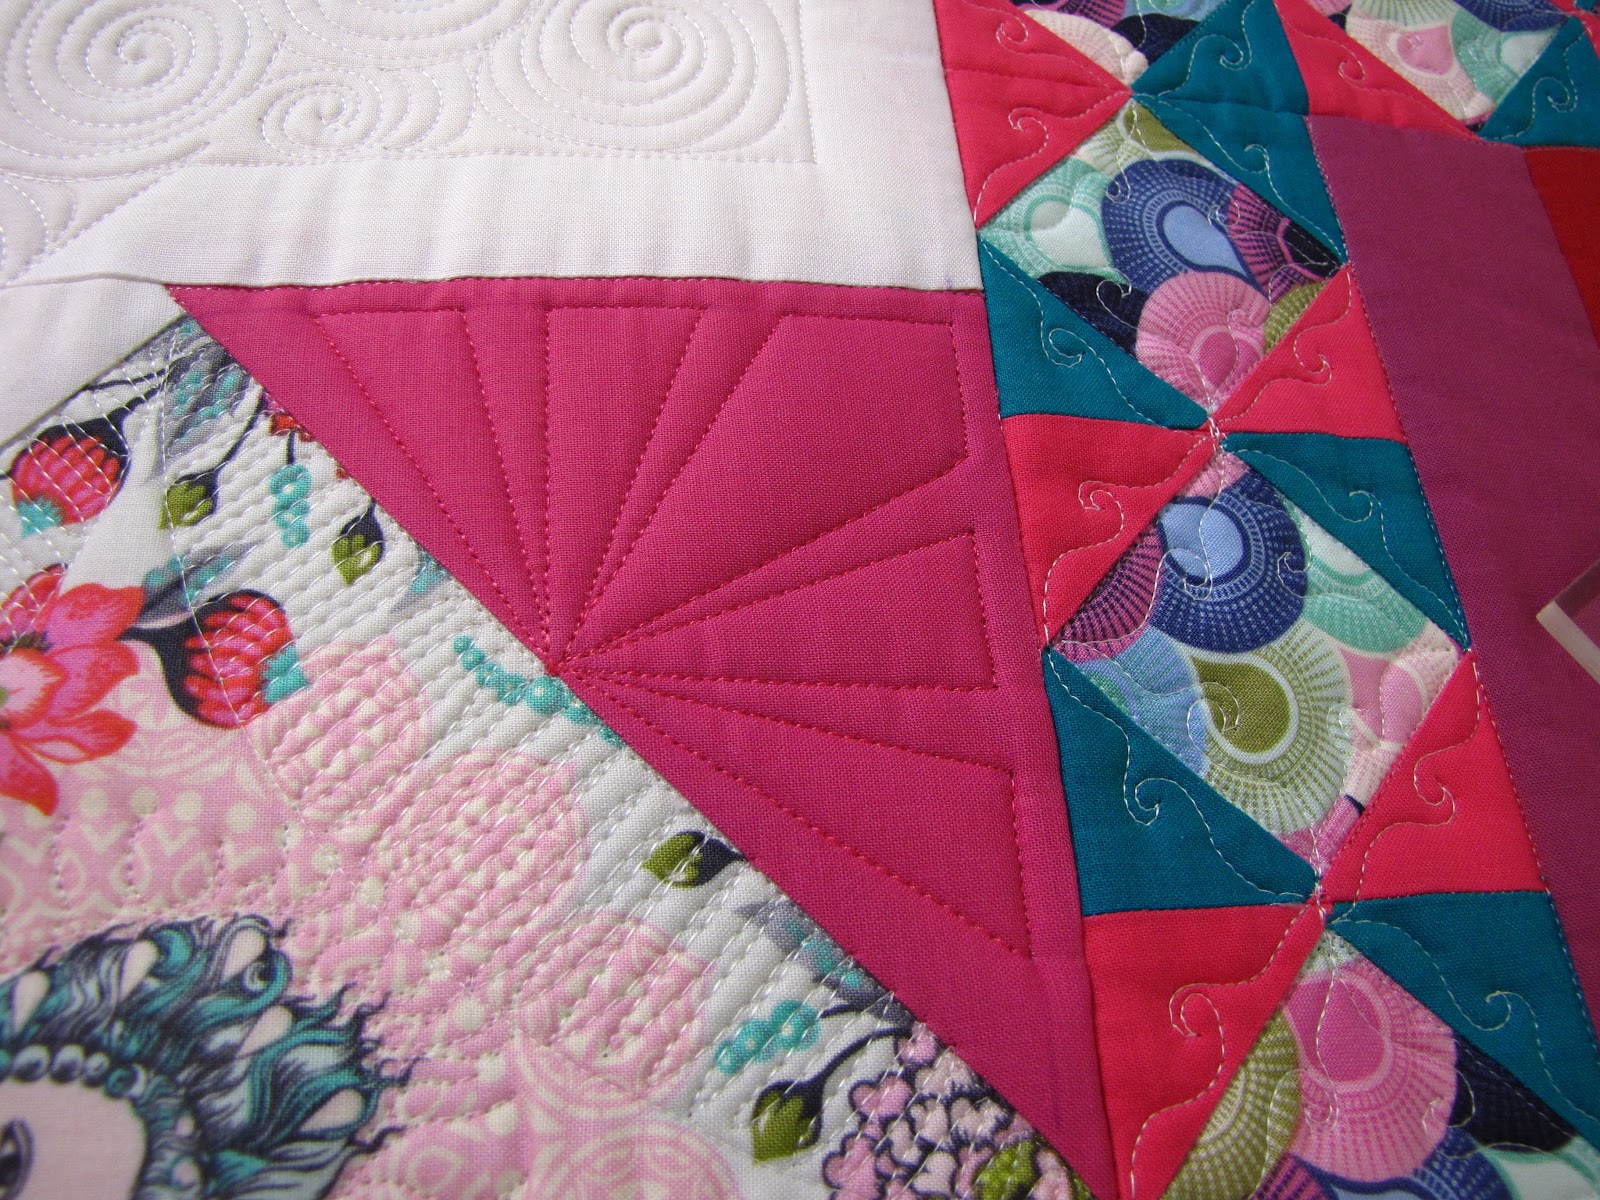
All Those Corners
All the SIS blocks have outside corners. So here we go!
Refer to the Quilting Design Diagram. Mark a line 1/4" in along the long side of the corner triangle. Mark the half way point on that line. Mark 3/4" on each side of the half way mark. This give you a 1 1/2" line that straddles the half way mark. Mark 1/2" further along on one side, then 1 1/2", then 1/2", then 1 1/2". Make the same marks on the other side.
Start with needle down on the point, stitch to a mark on one side of the center point. Stitch along the 1 1/2" increment that straddles the centre mark. Stitch back to the starting corner. Repeat for all the 1 1/2" increments, as shown below.
Repeat for all the large corners (Centre Elizabeth and Flying Geese).
Now on to the 11" SIS blocks - top and bottom of quilt. Each as two coloured corners to quilt.
This time we are starting to stitch from the centre of the long side. Mark 1/4" inside each of the short sides. At the corner, mark 1" along each side, then 1/2", then 1", then 1/2", then 1".
Start at the center of the long edge, needle down. Stitch out to one of the marked increments, stitch along the marked border, back to the starting point. Continue until finished as shown above.
Wrought Iron
I love wrought iron designs - and there are so many great Art Deco wrought iron designs. I incorporated some wrought iron inspired designs into my quilting.
Part One - Accent Blocks and Striped Blocks
The quilting design used for the Accent Blocks and the Striped Blocks is the same, just a different scale. I will describe it for the Accent Blocks and note the measurements for the Striped Blocks.
Starting the centre of the quilt, mark off 3" increments to the edge. Mark off about 3/8" on the long edge of the block that is to be bound. This is a reminder to not quilt into the binding area. Referring to the diagram (because I forgot to take pix of this) mark the diagonals from the centre edge to the outside edge. This could be "dot-to-dot" quilting, but I like to mark the entire line so I have a boundary line for my curly things - don't want to go over that line if I can help it. Refer to the diagram below -
- Start at the bottom right corner (of the diagram, it will change with each block), stitch the mustache curl to the left, bringing it to the first 3" increment. Back-tract to the starting point. Stop, needle down.
- Stitch the diagonal up to the top of the first 3" increment. Stop, needle down.
- Stitch the mustache curl to the right, bringing it to the starting side, back-track to the first 3" increment, stop, needle down.
- Stitch the mustache curl to the left, bringing it to the next 3" increment, back-track to the first 3" increment, stop, needle down.
- And so on until it's finished.
The process is the same for the Striped Blocks. Here I marked the width-wise centre, then marked the half way line for each half, then in half again for eight sections. The top and bottom strip are "as is", the centre stripe is mark in half lengthwise. Mark in the diagonals as shown above, then quilt as per the diagram above.
Part Two - Graduated Blocks
As shown above, I used the top of each colour column and marked a line horizontally across the remaining colour columns. Mark each of these sections in half again. Mark a vertical 1" line in each section, alternating sides. Mark 1/2" down from the horizontal dividing line in the 1" section. These are your guidelines. Refer to the Quilting Diagram to ensure correct placement - the wide and narrow sections alternate horizontally across the columns.
Start, needle down, at the seam closest to the centre blocks., as shown above.
Stitch a short curl in the 1" space, bringing up to the line you marked at 1/2" from the dividing line. Backtrack to the starting point and stitch a short curl on each side of the "stem".
Travel part way up the stem and then curve off in the opposite direction to make a large curl into the large space, taking the curl right up to the dividing line. Backtrack only as far as the next "stem" line intersects the curl.
Repeat the process until reaching the top section and finishing. Stop and tie off. Start the next column. Four columns in each block, four blocks. Done!
Now You're Done!!!!
Congratulations!
Here are some pix of my finished quilt.